Post by Game on Aug 15, 2012 19:01:16 GMT -5
This code does exactly as the title suggest.
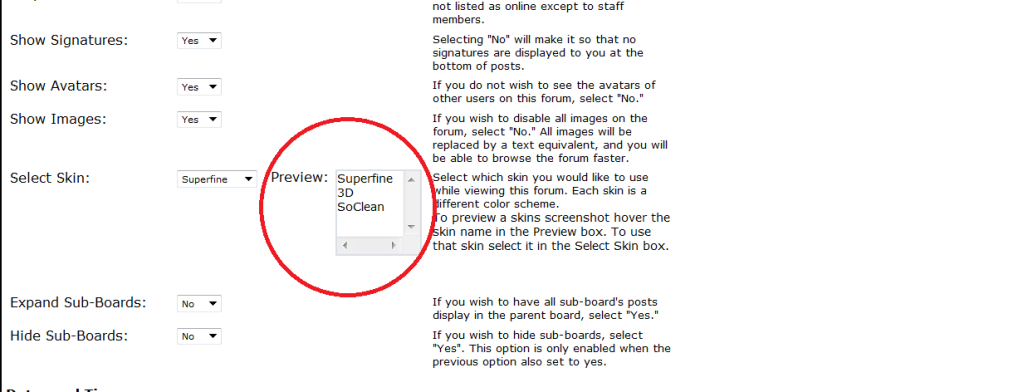
It gives your members the option to preview a skin before selecting it.
It adds a scroll box next to the default "Select Skin" dropdown menu which contains the names of your skins.

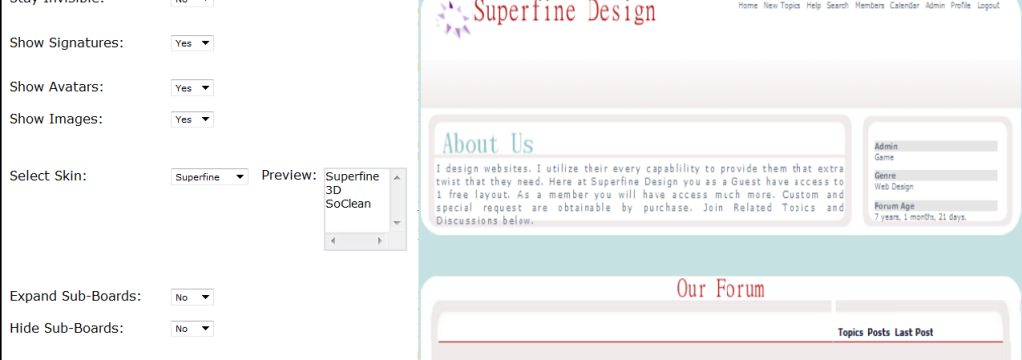
If you hover a skin name an image of that skins screenshot will appear to the right.

Note: The Image above has been cut , it is a full-view in actuality
t also adds a brief set of instructions below the default instructions.

To see a live preview you will need to register at my test site and go to modify profile.
To make your life easier I have Account Activation off.
First things first
You will need to make your own screenshots.
To do so,
1.) Open the skin you wish to add to your preview list
2.) Adjust the window to capture the screen how you wish (simply do this by scrolling up or down)
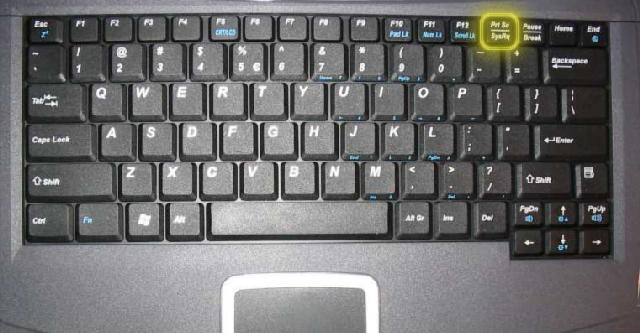
3.) Press PRTSC on your keyboard

4.) Open Paint
5.) Click Paste or right click/Paste
6.) Use select tool to select the area of the image that you want to keep and then select Crop
7.) Save image
8.) Go to a free host such a Imageshack.com or Photobucket.com
and upolaad the image.
Note: It doesn't really matter the size of your image because the code adjust the dimensions for you.
There is one section of code that you will need to edit.
That consist of adding your skin name and adding the url to that skins screenshot.
In the example below I have added 3 instances of my skins name and I have also added the url of the images that are associated with each individual skin..
Skin_1= "Superfine"
Skin1_Image="i1157.photobucket.com/albums/p595/Gamethefirst/screenshot1.png"
Skin_2= "3D"
Skin2_Image="i1157.photobucket.com/albums/p595/Gamethefirst/screenshot2.png"
Skin_3="SoClean"
Skin3_Image="i1157.photobucket.com/albums/p595/Gamethefirst/screenshot3.png"
Skin_4=""
Skin4_Image=""
Skin_5=""
Skin5_Image=""
Skin_6=''
Skin6_Image=""
Skin_7=""
Skin7_Image=""
Skin_8=""
Skin8_Image=""
Skin_9=""
Skin9_Image=""
Skin_10=""
Skin10_Image=""
This code allows up to 10 skin screenshots.
If you donot have 10 skins, leave the remaining fields blank like I have done above.
Now for the actual code:
GLOBAL HEADER:
No editing required for this portion of code.
GLOBAL FOOTER:
Edit the portion as I explained a couple of steps ago.
This code does not order your skins previews the same as your Select Skins menu. You will need to do that yourself simply by adding them to the code in the same order that they are displayed in your Select Skin menu.
Be on the lookout for Version 2
*Automatically orders your skins for you.
*The actual Skin Select menu will have the hover effect eliminating the preview box.
It gives your members the option to preview a skin before selecting it.
It adds a scroll box next to the default "Select Skin" dropdown menu which contains the names of your skins.

If you hover a skin name an image of that skins screenshot will appear to the right.

Note: The Image above has been cut , it is a full-view in actuality
t also adds a brief set of instructions below the default instructions.

To see a live preview you will need to register at my test site and go to modify profile.
To make your life easier I have Account Activation off.
First things first
You will need to make your own screenshots.
To do so,
1.) Open the skin you wish to add to your preview list
2.) Adjust the window to capture the screen how you wish (simply do this by scrolling up or down)
3.) Press PRTSC on your keyboard

4.) Open Paint
5.) Click Paste or right click/Paste
6.) Use select tool to select the area of the image that you want to keep and then select Crop
7.) Save image
8.) Go to a free host such a Imageshack.com or Photobucket.com
and upolaad the image.
Note: It doesn't really matter the size of your image because the code adjust the dimensions for you.
There is one section of code that you will need to edit.
That consist of adding your skin name and adding the url to that skins screenshot.
In the example below I have added 3 instances of my skins name and I have also added the url of the images that are associated with each individual skin..
Skin_1= "Superfine"
Skin1_Image="i1157.photobucket.com/albums/p595/Gamethefirst/screenshot1.png"
Skin_2= "3D"
Skin2_Image="i1157.photobucket.com/albums/p595/Gamethefirst/screenshot2.png"
Skin_3="SoClean"
Skin3_Image="i1157.photobucket.com/albums/p595/Gamethefirst/screenshot3.png"
Skin_4=""
Skin4_Image=""
Skin_5=""
Skin5_Image=""
Skin_6=''
Skin6_Image=""
Skin_7=""
Skin7_Image=""
Skin_8=""
Skin8_Image=""
Skin_9=""
Skin9_Image=""
Skin_10=""
Skin10_Image=""
This code allows up to 10 skin screenshots.
If you donot have 10 skins, leave the remaining fields blank like I have done above.
Now for the actual code:
GLOBAL HEADER:
No editing required for this portion of code.
<style>
#main_div{float:right; width: 140px;}
#secondary_div{background-color:#dbdfe6; color: #FFFFFF; border: 2px solid #dbdfe6; float:right; margin-right: 1px; position:relative; top:-15px;}
#scroll_div{width:75px; background-color:FFFFFF; color: #000000; height: 80px; border-width: 1px; overflow: scroll;}
.skins{width: 850px; height: 100%; position: absolute; top: 1400px; left: 470px; display:none;}
</style>
<!--[if IE]>
<style>
#main_div{float:right; width: 150px; position:relative; top:-17px;}
#secondary_div{background-color:#dbdfe6; color: #FFFFFF; border: 2px solid #dbdfe6; float:right; margin-right: 4px; position:relative; top:-15px;}
#scroll_div{width:80px; background-color:FFFFFF; color: #000000; height: 80px; border-width: 1px; overflow: scroll;}
.skins{width: 800px; height: 100%; position: absolute; top: 1400px; left: 460px; display:none;}
</style>
<![endif]-->
<img id= "skin1" class= "skins">
<img id= "skin2" class= "skins">
<img id= "skin3" class= "skins">
<img id= "skin4" class= "skins">
<img id= "skin5" class= "skins">
<img id= "skin6" class= "skins">
<img id= "skin7" class= "skins">
<img id= "skin8" class= "skins">
<img id= "skin9" class= "skins">
<img id= "skin10" class= "skins">
GLOBAL FOOTER:
Edit the portion as I explained a couple of steps ago.
<script type="text/javascript">
if(pb_action=="modifyprofile"){
//code by Game
//Edit Below
Skin_1= ""
Skin1_Image=""
Skin_2= ""
Skin2_Image=""
Skin_3=""
Skin3_Image=""
Skin_4=""
Skin4_Image=""
Skin_5=""
Skin5_Image=""
Skin_6=''
Skin6_Image=""
Skin_7=""
Skin7_Image=""
Skin_8=""
Skin8_Image=""
Skin_9=""
Skin9_Image=""
Skin_10=""
Skin10_Image=""
//NOMORE EDITING
td=document.getElementsByTagName('td')
for(i=0;i<td.length;i++){
if(td[i].width=='160' && td[i].innerHTML.match(/Select Skin/)){
td[i].nextSibling.innerHTML+=
'<div id="main_div"><div><font size="2px">Preview:</font></div><div id="secondary_div"><div id="scroll_div"><div id="skin_1" onmouseover="showskin1()" onmouseout="hideskin1()"></div><div id="skin_2" onmouseover="showskin2()" onmouseout="hideskin2()"></div><div id="skin_3" onmouseover="showskin3()" onmouseout="hideskin3()"></div><div id="skin_4" onmouseover="showskin4()" onmouseout="hideskin4()"></div><div id="skin_5" onmouseover="showskin5()" onmouseout="hideskin5()"></div><div id="skin_6" onmouseover="showskin6()" onmouseout="hideskin6()"></div><div id="skin_7" onmouseover="showskin7()" onmouseout="hideskin7()"></div><div id="skin_8" onmouseover="showskin8()" onmouseout="hideskin8()"></div><div id="skin_9" onmouseover="showskin9()" onmouseout="hideskin9()"></div><div id="skin_10" onmouseover="showskin10()" onmouseout="hideskin10()"></div></div></div></div>'
document.getElementById("skin_1").innerHTML=Skin_1
document.getElementById("skin1").src=Skin1_Image
document.getElementById("skin_2").innerHTML=Skin_2
document.getElementById("skin2").src=Skin2_Image
document.getElementById("skin_3").innerHTML=Skin_3
document.getElementById("skin3").src=Skin3_Image
document.getElementById("skin_4").innerHTML=Skin_4
document.getElementById("skin4").src=Skin4_Image
document.getElementById("skin_5").innerHTML=Skin_5
document.getElementById("skin5").src=Skin5_Image
document.getElementById("skin_6").innerHTML=Skin_6
document.getElementById("skin6").src=Skin6_Image
document.getElementById("skin_7").innerHTML=Skin_7
document.getElementById("skin7").src=Skin7_Image
document.getElementById("skin_8").innerHTML=Skin_8
document.getElementById("skin8").src=Skin8_Image
document.getElementById("skin_9").innerHTML=Skin_9
document.getElementById("skin9").src=Skin9_Image
document.getElementById("skin_10").innerHTML=Skin_10
document.getElementById("skin10").src=Skin10_Image
td[i].nextSibling.nextSibling.innerHTML+="<br>To preview a skins screenshot hover the skin name in the Preview box. To use that skin select it in the Select Skin box."
}}}
</script>
<script>
function showskin1()
{document.getElementById("skin1").style.display="inline"}function hideskin1(){document.getElementById("skin1").style.display="none"}
function showskin2()
{document.getElementById("skin2").style.display="inline"}function hideskin2(){document.getElementById("skin2").style.display="none"}
function showskin3()
{document.getElementById("skin3").style.display="inline"}function hideskin3(){document.getElementById("skin3").style.display="none"}
function showskin4()
{document.getElementById("skin4").style.display="inline"}function hideskin4(){document.getElementById("skin4").style.display="none"}
function showskin5()
{document.getElementById("skin5").style.display="inline"}function hideskin5(){document.getElementById("skin5").style.display="none"}
function showskin6()
{document.getElementById("skin6").style.display="inline"}function hideskin6(){document.getElementById("skin6").style.display="none"}
function showskin7()
{document.getElementById("skin7").style.display="inline"}function hideskin7(){document.getElementById("skin7").style.display="none"}
function showskin8()
{document.getElementById("skin8").style.display="inline"}function hideskin8(){document.getElementById("skin8").style.display="none"}
function showskin9()
{document.getElementById("skin9").style.display="inline"}function hideskin9(){document.getElementById("skin9").style.display="none"}
function showskin10()
{document.getElementById("skin10").style.display="inline"}function hideskin10(){document.getElementById("skin10").style.display="none"}
</script>
This code does not order your skins previews the same as your Select Skins menu. You will need to do that yourself simply by adding them to the code in the same order that they are displayed in your Select Skin menu.
Be on the lookout for Version 2
*Automatically orders your skins for you.
*The actual Skin Select menu will have the hover effect eliminating the preview box.
